• home

Fuse Box Ford 2008 F150 Passenger Compartment Diagram

Fuse Box Ford 2008 F150 Passenger Compartment Diagram - Here are new post for Fuse Box Ford 2008 F150 Passenger Compartment Diagram.

Fuse Box Ford 2008 F150 Passenger Compartment Diagram


Fuse Box Ford 2008 F150 Passenger Compartment Diagram

Fuse Panel Layout Diagram Parts: Brake shift interlock solenoid, Fog lamp relay, Electrochromatic mirror, Heated seats, BSM, Compass, RSS (Reverse Sensing System), Power Rail, Delayed accessory power for audio, Run/Accessory Wipers, Instrument cluster, Audio for XL/STX, Parklamps, Body Security Module (BSM), Instrument Panel Illumination, Radio (Start signal), Heated Mirros, Switch Indicators, Fuel Pump Relay, Fuel Injectors, Injector Sense, Trailer Tow back up Lamps relay, Trailer tow parklamp relay, A/C Clucth, 4×4 solenoid, PCM relay coil, Climate control module power, Flasher relay, Back up lamp and Dyatime Running Lamps (DRL) relay coil, A/C pressure switch, Redundant speed control switch, Heated PCV (5.4L). ABS, Overdrive cancel, Memory seats and pedals. DVD battery power, Power fold mirror, Keep alive memory for Powertrain Control Module (PCM) and Climate Control Module, Cluster, Battery saver power for demand lamps, Cluster airbag warning lamp, Vapor Management Valve (VMV), A/C clucth relay, Canister vent, Heated Exhaust Gas Oxygen (HEGO) sensors # 11 and # 21, Stop/Turn Lamps, ABS, T/T electric brake module, PCM (BOO signal), turn signal mirros, CHSML, Power Mirrors, Variable Cam Timing (VCT), Heated Positive Crankscase Ventilation (PCV) valve (4.2L engine), CID sensor (4.2L engine), 4.6L/4.2L, EGERFlex fuel, power door lock switch and moon roof switch illumination, CMCV, Mass Air Flow (MAF) sensor, Passenger Airbag Deactivation (PAD) warning lamp.

Car anti theft wireless alarm

 This FM radio-controlled anti- theft alarm can be used with any vehicle having 6- to 12-volt DC supply system. The mini VHF, FM transmitter is fitted in the vehicle at night when it is parked in the car porch or car park. The receiver unit with CXA1019, a single IC-based FM radio module, which is freely available in the market at reasonable rate, is kept inside. Receiver is tuned to the transmitters frequency. When the transmitter is on and the signals are being received by FM radio receiver, no hissing noise is available at the output of receiver. Thus transistor T2 (BC548) does not conduct. This results in the relay driver transistor T3 getting its forward base bias via 10k resistor R5 and the relay gets energised. When an intruder tries to drive the car and takes it a few metres away from the car porch, the radio link between the car (transmitter) and alarm (receiver) is broken. As a result FM radio module gene-rates hissing noise. Hissing AC signals are coupled to relay switching circ- uit via audio transformer. These AC signals are rectified and filtered by diode D1 and capacitor C8, and the resulting positive DC voltage provides a forward bias to transistor T2. Thus transistor T2 conducts, and it pulls the base of relay driver transistor T3 to ground level. The relay thus gets de-activated and the alarm connected via N/C contacts of relay is switched on. If, by chance, the intruder finds out about the wireless alarm and disconnects the transmitter from battery, still remote alarm remains activated because in the absence of signal, the receiver continues to produce hissing noise at its output. So the burglar alarm is fool-proof and highly reliable.

Wiring Connectingceiling Professional Tool Reviews

Wiringlight on Trail Lights   Page 2   Grizzly Riders   Yamaha Grizzly Atv Forum
Trail Lights Page 2 Grizzly Riders Yamaha Grizzly Atv Forum.


Wiringlight on Wiring A Light Switch   Electrical Online
Wiring A Light Switch Electrical Online.


Wiringlight on Light Wiring
Light Wiring.


Wiringlight on One Way Lighting Circuit Using In Line Switching
One Way Lighting Circuit Using In Line Switching.


Wiringlight on Com Wp Content Uploads 2011 4 14 How To Wire Double Light Switchin Jpg
Com Wp Content Uploads 2011 4 14 How To Wire Double Light Switchin Jpg.


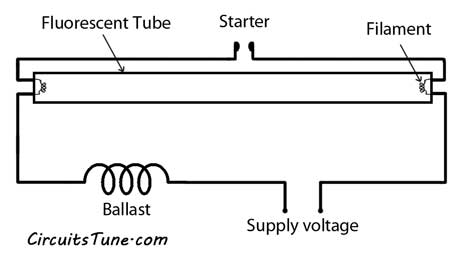
Wiringlight on Fluorescent Light Wiring Diagram   Tube Light Circuit
Fluorescent Light Wiring Diagram Tube Light Circuit.


Wiringlight on Ceiling Light Fixture Fix   Wire Ceiling Lighting   Esquire
Ceiling Light Fixture Fix Wire Ceiling Lighting Esquire.


Wiringlight on Wiring And Connecting A Ceiling Fan    Professional Tool Reviews For
Wiring And Connecting A Ceiling Fan Professional Tool Reviews For.


Wiringlight on Wire A Light Switch In Your Home    By Tara Gilbert Wiring A Light
Wire A Light Switch In Your Home By Tara Gilbert Wiring A Light.


Wiringlight on We Have A Two Way Switch Circuit For The Lights In Our Living Room
We Have A Two Way Switch Circuit For The Lights In Our Living Room.


Infrared Alarm Barrier Circuit

This infrared alarm barrier can be used to detect persons passing through doorways, corridors and small gates. The transmitter emits a beam of infrared light which is invisible to the human eye. The buzzer at the output of the receiver is activated when the light beam is interrupted by a person passing through it.


Infrared Light Alarm Transmitter Circuit Schematic


Infrared Alarm Barrier Receiver Circuit Schematic


How to make an infrared barrier alarm
The transmitter and receiver circuits of the infrared alarm system shown here have been designed for a range of several meters, almost independent of ambient light conditions. Only in the rare case of the receiver sensor being exposed to bright, direct sunlight, some screening measures have to be added.
The transmitter does not emit a continuous infrared signal, Rather, it is modulated, that is, the 36-kHz carrier used to pulse the IRED (infrared emitting diode) on and off is itself switched on an off at a rate of about 300 Hz. The reason for doing so is that most infrared sensors, including the ones suggested in the diagram do not respond very well to continuous incidence of infrared light. Switching the IR source off, even for a small period, allows IR detectors to ‘recuperate’, and so optimise their ability to minimize the response to ambient light.
The transmitter consists of two oscillators built around the ubiquitous 555 IC. Here, the current-saving CMOS version TLC555 (or 7555) is used. Alternatively, the two 555’s may be replaced by a single TLC556 (or 7556). IC1 is the 300-Hz generator, IC2, the 36-kHz source. The IRED type LD274 is pulsed at a relatively high peak current via driver transistor T1. If in your application the distance covered by the IR beam is relatively short, the value of resistor R5 may be increased to save on current consumption. Preset P1 is adjusted for a carrier frequency of 36 kHz exactly (failing test equipment, adjust it for optimum range).
The receiver is equally simple and also based on a CMOS 555. As long as the sensor picks up infrared light from the transmitter, the reset input of the 555 IC is held low and the buzzer is silent. Components D1 and C2 act as a low-frequency rectifier to cancel the effect of the 300-Hz modulation on the transmitter signal. When the infrared light beam is interrupted, the oscillator built around the 555 is enabled and starts to produce a warning tone.
Finally, the test values indicated in the infrared barrier alarm circuit diagram are average dc levels measured with a DVM, under light/no light conditions. In fact, most test points carry rectangular or sawtooth waveforms.
555 datasheet

Making a 220v to 110V Transformerless Converter Circuit

The presented circuit has been taken from an old elektor electronic magazine which describes a neat little circuit for converting 220V mains input to 110V AC. Lets learn more about the circuit details.

Circuit Description

The shown circuit diagram of a transformerless 220v to 110v converter utilizes a triac and a thyristor arrangement for making the circuit successfully work as a 220v to 110v converter.

The right end of the circuit consists of  a triac switching configuration where the triac becomes the main switching element.
The resistors and the capacitors around the triac is kept for presenting perfect driving parameters to the triac.
The left section of the diagram shows another switching circuit which is used to control the switching of the right hand side triac and consequently the load. The transistors at the extreme right of the diagram are simply there to trigger the SCR Th1 at the right moment.
The supply to the entire circuit is applied across the terminals K1, via the load RL1 which is in fact a 110V specified load.
Initially the half wave DC derived through the bridge network compels the triac to conduct the full 220V across the load.
However in the course, the bridge starts getting activated causing an appropriate level of voltage to reach the right hand section of the configuration.
The DC thus generated instantly activates the transistors which in turn activates the SCR Th1.
This causes short circuiting of the bridge output, choking the entire trigger voltage to the triac, which finally ceases to conduct, switching off itself and the entire circuit.
The above situation reverts and restores the original state of the circuit and initiates a fresh cycle and the system repeats, resulting in a controlled voltage across the load and itself.
The transistors configuration components are so selected that the triac is never allowed to reach above the 110V mark thus keeping the load voltage well within the intended limits.
The shown "REMOTE" points must be kept joined normally.
The circuit is recommended for operating resistive loads only, rated at 110V, below 200 watts.


12 Volt Off Line Power Supply

This is a simple circuit for switching power supply. This circuit is using converter concept. This is the figure of the circuit.


This circuit can work over an universal input AC line voltage range 90-240 VAC and provides 12 VDC output when over 4A loaded. Line and load regulation is better than 0,5%. This circuit has over current, over temperature, over voltage protection. The output ripple is approximately 0,2Volt peak to peak.

Dual rail Variable DC Power Supply

Simple add-on for a single-rail supply, ±2.5V to ±15V output


This design was conceived as an add-on for the Variable DC Power Supply, a very successful circuit posted to this website. This simple unit provides a dual-rail variable output ranging from ±2.5V to ±15Vdc with precise tracking of the positive and negative output voltages, still retaining the current limiting and short-proof capabilities of the "master" circuit. As the purpose of such a dual-rail design is to supply experimental or under-repair circuits, the maximum current output delivered was deliberately kept to about 500 - 600mA per rail, thus avoiding the use of expensive power transistors and complex circuitry.


Circuit Diagram:


Dual-rail Variable DC Power Supply Circuit Diagram


Parts:

R1 = 4.7K-1/2W
R1 = 4.7K-1/2W
C1 = 100nF-63V
C2 = 220µF-25V
C3 = 220µF-25V
C4 = 100nF-63V
C5 = 100nF-63V
Q1 = BD437
Q2 = BD438
IC1 = LM358


Notes:
  • The circuit can be placed into the existing Variable DC Power Supply metal cabinet.
  • Q1 and Q2 must be mounted on heatsinks. Usually, bolting them to the metal case (through insulating washers etc.) proved effective.
  • The full ±15V output can be achieved only if the secondary winding of the supply Transformer used in the Variable DC Power Supply is rated at 48V minimum (center tapped).
  • When using this circuit, please set the Current-limit control (P1) of the Variable DC Power Supply to any value comprised in the 50mA - 1A range but not higher.
  • The second Op-amp (IC1B) contained in the LM358 chip was not used, but its input pins were tied to the negative supply and the output was left open.


Source : www.redcircuits.com

Flugzeugepiper Saratoga

Piper Aircraft on Piper Aircraft Corporation   Pa 28r 201
Piper Aircraft Corporation Pa 28r 201.


Piper Aircraft on Flugzeuge De   Piper 28 Rt
Flugzeuge De Piper 28 Rt.


Piper Aircraft on Piper Aircraft
Piper Aircraft.


Piper Aircraft on Piper Colt  A Two Place Bargain   Aircraft Market Place
Piper Colt A Two Place Bargain Aircraft Market Place.


Piper Aircraft on Piper Warrior Iii Personal Sport Aircraft   Travel Gadgets
Piper Warrior Iii Personal Sport Aircraft Travel Gadgets.


Piper Aircraft on Flugzeuge De   Piper Saratoga Ii Hp
Flugzeuge De Piper Saratoga Ii Hp.


Piper Aircraft on Flugzeuge De   Piper Pa 30  N7311y
Flugzeuge De Piper Pa 30 N7311y.


Piper Aircraft on Flugzeuge De   Piper P28 T Cockpit
Flugzeuge De Piper P28 T Cockpit.


Piper Aircraft on Piper Aircraft Feierte Vom 9  Bis Zum 11  November 2012 An Ihrem
Piper Aircraft Feierte Vom 9 Bis Zum 11 November 2012 An Ihrem.


Piper Aircraft on Cr Piper Aircraft  Piper Seneca V
Cr Piper Aircraft Piper Seneca V.


Automatic LED Emergency Light Circuit

This is one of the most cost effective (cheap) and simple emergency light circuit developed for CircuitsToday – This is an automatic emergency lamp with day light sensing, means it senses darkness/night and turns ON automatically. Similarly it senses day light and turns OFF automatically.

A simple emergency lamp which does not require any special equipment; even a multimeter to assemble and use. Any individual who can do a good quality soldering must be able to build this circuit successfully. This can be easily accommodated in the defunct two 6 watt tube National Emergency Lamp or any PL tube type emergency lamp. The difference will be in the working; it will work non stop for more than 8 hours. Deep discharge is taken care by the LED characteristic and over charge protection is taken care by the fixed voltage regulator.This uses a simple 3Pin fixed regulator which has a built in current limiting circuit. The only required adjustment is the preset which has to be set to ensure the LEDs just light up (it should be left at that position). The 5mm LDR is just mounted on top of the emergency light as shown in the photograph. LDR is used to avoid it lighting up during day time or when the room lights are ON. 2 LEDs are used in series; the dropping resistance is avoided and 2 LEDs light up with current that is required for a single LED,  by which energy is saved to a great extent.

Circuit diagram :


Simple-emergency-LampSimple Emergency Light Circuit Diagram

Note:

This circuit is developed by Mr.Seetharaman for readers of CircuitsToday. This particular circuit has been kept so simple for people who has limited access to components or in other words this is an emergency light that you can build with minimum components. In addition to circuit diagram, He has shared photographs of the prototype he made in National emergency light and a PCB design.

Source :www.circuitstoday.com

Automatic Loudness Control Circuit

This is a simple design for automatic loudness control in audio. A simple approach to this problem can be done inserting a circuit in the preamplifier stage, capable of varying automatically the frequency response of the entire audio chain in respect to the position of the control knob, in order to keep ideal listening conditions under different listening levels. This is a figure of the circuit.


The circuit is shown with SW1 in the "Control-flat" position, i.e. without the Automatic Loudness Control. In this position the circuit acts as a linear preamplifier stage, with the voltage gain set by means of Trimmer R7. Switching SW1 in the opposite position the circuit becomes an Automatic Loudness Control and its frequency response varies in respect to the position of the control knob by the amount shown in the table below. C1 boosts the low frequencies and C4 boosts the higher ones. Maximum boost at low frequencies is limited by R2; R5 do the same at high frequencies.

This is a list component that must using for built the circuit.

P1 10K Linear Potentiometer (Dual-gang for stereo)

R1, R6, R8 100K 1/4W Resistors
R2 27K 1/4W Resistor
R3, R5 1K 1/4W Resistors
R4 1M 1/4W Resistor
R7 20K 1/2W Trimmer Cermet

C1 100nF/63V
C2 47nF/63V
C3 470nF/63V
C4 15nF/63V
C5, C9 1µF/63V
C6, C8 47µF/63V
C7 100pF/63V

IC1 TL072 Dual BIFET Op Amp

SW1 DPDT Switch (four poles for stereo)

Ethernet Phone Jack Single Cat5e Cablemavromatic

Cat5e Wiring Diagram on Gefen Component Audio Over Cat5 Wiring Diagram
Gefen Component Audio Over Cat5 Wiring Diagram.


Cat5e Wiring Diagram on Terminating Rj 45  Cat5 Cat5e Cat6 Data
Terminating Rj 45 Cat5 Cat5e Cat6 Data.


Cat5e Wiring Diagram on An Ethernet And Phone Jack Using A Single Cat5e Cable   Mavromatic
An Ethernet And Phone Jack Using A Single Cat5e Cable Mavromatic.


Cat5e Wiring Diagram on Wiring Diagram For An Ethernet Crossover Cable
Wiring Diagram For An Ethernet Crossover Cable.


Cat5e Wiring Diagram on Structured Wiring Retro   Install 1
Structured Wiring Retro Install 1.


Cat5e Wiring Diagram on Cat 5 Wiring Diagram   Crossover Cable Diagram
Cat 5 Wiring Diagram Crossover Cable Diagram.


Cat5e Wiring Diagram on Rj45 Pinout Wiring  How To Make Up A 10baset 100baset Connection  Eia
Rj45 Pinout Wiring How To Make Up A 10baset 100baset Connection Eia.


Cat5e Wiring Diagram on Wiring Diagram For Nuvo Concerto System
Wiring Diagram For Nuvo Concerto System.


Cat5e Wiring Diagram on Wiring   Cabling Companies In Arden     Fiber Optics  Cat5  Cat 6  And
Wiring Cabling Companies In Arden Fiber Optics Cat5 Cat 6 And.


Cat5e Wiring Diagram on Ethernet Wiring Diagram  Large
Ethernet Wiring Diagram Large.


Peak Electronic Design Limitedethernet Wiring Diagramspatch

Cat5e Wiring Diagram on Diagram Of Cat 5e Ethernet Jack 568b Wiring
Diagram Of Cat 5e Ethernet Jack 568b Wiring.


Cat5e Wiring Diagram on How To Guide  Creating Cat 5 Utp Ethernet Crossover Cable   How To
How To Guide Creating Cat 5 Utp Ethernet Crossover Cable How To.


Cat5e Wiring Diagram on Peak Electronic Design Limited   Ethernet Wiring Diagrams   Patch
Peak Electronic Design Limited Ethernet Wiring Diagrams Patch.


Cat5e Wiring Diagram on Cat5e Wiring
Cat5e Wiring.


Cat5e Wiring Diagram on Gefen Component Audio Over Cat5 Wiring Diagram
Gefen Component Audio Over Cat5 Wiring Diagram.


Cat5e Wiring Diagram on Terminating Rj 45  Cat5 Cat5e Cat6 Data
Terminating Rj 45 Cat5 Cat5e Cat6 Data.


Cat5e Wiring Diagram on An Ethernet And Phone Jack Using A Single Cat5e Cable   Mavromatic
An Ethernet And Phone Jack Using A Single Cat5e Cable Mavromatic.


Cat5e Wiring Diagram on Wiring Diagram For An Ethernet Crossover Cable
Wiring Diagram For An Ethernet Crossover Cable.


Cat5e Wiring Diagram on Cat 5 Wiring Diagram   Crossover Cable Diagram
Cat 5 Wiring Diagram Crossover Cable Diagram.


Cat5e Wiring Diagram on Structured Wiring Retro   Install 1
Structured Wiring Retro Install 1.